Causes, prevention, recognition: pulpal overheating, pulp exposure, under- and over-preparation, damage to surrounding structures
ICD-10: —
Overview: Why a Preparation Error Costs More Than Any Other
A phantom head forgives everything. An overheated phantom tooth will not ache at night, a scratched proximal surface of the neighbouring tooth will not develop caries a year later, and a fractured cusp will not bring the patient back to the chair. That is exactly why the pre-clinical stage is the only place where a preparation error can be analysed without harming a living person. And that is why it must be analysed here in full: cavity preparation is irreversible. Enamel and dentin that have been cut away do not grow back, and a pulp that has been injured irreversibly does not recover. Part of the pulpal response to heat is reversible — where that boundary runs is set out below, among the signs of thermal injury.
The requirements for the cavity floor, walls, margins and angles, the sequence of preparation steps and the minimally invasive approach are covered in the module "Principles of Cavity Preparation". Bur shapes and indications, handpiece types and speed ranges are covered in the module "Classification of Dental Instruments and Burs". This article reads the same material from the opposite direction: what happens when a requirement is violated, which sign makes the violation visible, and which specific action of the operator made the error possible.
After studying this section you will be able to: name the four groups of preparation complications and the mechanism of each; explain why a pulpal temperature rise of only a few degrees produces an irreversible outcome, and state the order of magnitude of the critical threshold; list the signs by which pulp chamber exposure, under- and over-preparation, and injury to the adjacent tooth, gingiva and mucosa are recognised; describe the sequence of the self-check of a finished cavity against a checklist before restoration begins.
Critical pulpal temperature rise: +5.5 °C — intrapulpal rise that produced irreversible necrosis in ~15% of teeth (Zach & Cohen, 1965)
Rise of +11 °C: ~60% — proportion of teeth with pulp necrosis in the same experiment
Cutting mode: Intermittent — short light strokes instead of continuous sustained pressure
Reversibility of tissue loss: None — the volume of tissue removed is not restored: reparative dentin does form, but it does not give back the lost geometry — an error of volume can only be compensated by a restoration design
1 Thermal: injury to the pulp — Overheating of tooth structure during cutting. Friction of the bur becomes heat, heat travels through dentin and the dentinal tubules to the pulp, and the pulp responds with inflammation that may end in necrosis. Causes: insufficient or absent coolant, a dull bur, continuous pressure, a thin layer of remaining dentin. Key feature: nothing is visible at the moment of the error — there is no defect and the field looks normal.
2 Mechanical: injury to the tooth and pulp — Pulp chamber exposure and pulp denudation; under-preparation — retained softened dentin, an unopened fissure, unfinished margins; over-preparation — removal of sound structure with weakening of cusps and walls. The shared cause is loss of control over the depth and direction of the bur.
3 Damage to surrounding structures — The proximal surface of the adjacent tooth, the gingival margin and interdental papilla, the mucosa of the cheek, lip and tongue. Occurs with poor visibility, no finger rest and unprotected neighbouring tissues. Key feature: the operator usually does not notice the damage, and under anaesthesia the patient does not report it either.
4 Form errors with delayed presentation — Sharp internal angles, thin unsupported walls, no support beneath a cusp, overhanging enamel at the margin. On the day of treatment nothing happens at all. Fracture of the restoration or of the cusp, marginal gap and secondary caries appear months or years later, when the link with the preparation is no longer obvious.
Thermal Injury to the Pulp: Overheating
A bur removes tissue by friction, and most of the energy spent is converted into heat. Dentin is a poor conductor of heat, and it is dentin that acts as the thermal barrier for the pulp: the whole thermal reserve is set by the thickness of the dentin layer left between the cavity floor and the pulp. Hence the first practical consequence: the same thermal load is harmless on the floor of a moderate cavity and destructive on the floor of a deep one. The thinner the remaining dentin, the less heat is needed to injure the pulp. A remaining thickness of 0.5 mm is clinically acceptable in deep caries (the requirement is covered in the module "Principles of Cavity Preparation"), but at that thickness the thermal reserve is exhausted: cutting the floor of such a cavity with a bur is not acceptable, and tissue is removed with hand instruments only.
The pulpal response to heat is staged: vasodilation and increased vascular permeability, plasma exudation and oedema, compression of vessels within a closed space, impaired blood flow, stasis (blood flow in the capillaries comes to a standstill), necrosis. The decisive property of the pulp is that it is enclosed in the rigid walls of the pulp chamber and cannot swell outwards. The inflammatory oedema therefore becomes an injurious factor in its own right, and the process continues after the bur has been withdrawn. This is the main reason why thermal pulpal injury is so often irreversible although the heating lasted only seconds.
The order of magnitude of the critical threshold comes from a classical experiment: external heating that produced an intrapulpal temperature rise of 5.5 °C caused irreversible pulp necrosis in about 15% of teeth, and a rise of 11 °C in about 60% (Zach L., Cohen G., 1965). The practical message of these figures is not that heat is harmful — that is obvious — but that the permissible margin is extremely narrow and is secured not by careful hands, but by coolant, a sharp bur and intermittent cutting. The numerical benchmarks found in the literature are worth knowing, but not as a standard: coolant water delivery for high-speed cutting is usually quoted at the order of 50 mL/min, and a remaining dentin layer of about 2 mm is regarded as a reliable thermal barrier. Both figures are reference points that require checking against an operative dentistry text and against the manual of the particular unit, not norms to be memorised.
| Overheating factor | What happens | How to avoid it |
|---|---|---|
| Absent or insufficient coolant | Frictional heat is not carried away and the temperature at the cutting site rises continuously. Dry high-speed cutting is the fastest route to pulp necrosis | Check the spray before starting, not during the procedure: presence of water, its volume and its aim at the working part of the bur. If delivery is faulty, do not start cutting |
| Dull or worn bur | Cutting efficiency is lost: the bur no longer shears tissue but rubs against it. The operator compensates with pressure and heat generation rises several-fold | Change the bur at the first signs of lost cutting: the bur skids, pressure is needed, the sound of cutting has changed, the surface comes out rough |
| Continuous cutting under pressure | Heat accumulates: there is no pause during which the coolant can carry away the heat already generated | Intermittent technique: short light strokes, the bur constantly moving, never driven into a single point |
| Large bur at high speed | A larger contact area means more friction and more heat per unit of time, generated along the whole working length at once | Match bur size to the stage and to the size of the cavity; move to a smaller size and lower speed in deep areas |
| Thin layer of remaining dentin | Thermal insulation is minimal: heating that is safe with 2 mm of dentin injures the pulp with 0.5 mm | Assess depth on the periapical radiograph before starting. General rule: caries removal is performed with a low-speed handpiece and hand instruments, and the high-speed handpiece is not used for removing affected dentin at any depth (for the systematics see the module "Classification of Dental Instruments and Burs"); on the floor of a deep cavity this rule applies with particular force |
| Desiccation of exposed dentin | A strong air jet sets dentinal tubule fluid in motion and irritates the pulp. The mechanism is hydrodynamic, but the result is the same: pain and inflammation | Dry in short bursts from a distance, leaving the dentin slightly moist rather than chalk-white |
Hypersensitivity in the first days after treatment — A brief painful response to cold and sweet that stops as soon as the stimulus is removed. Usually reflects reversible pulpal irritation and calls for observation rather than intervention. With composite restorations the same complaint more often arises not from the preparation but from the adhesive protocol or an occlusal high spot — those causes lie outside this module.
Lingering pain to a thermal stimulus — Pain from cold or heat persists for more than a few seconds after the stimulus is removed. A sign that inflammation has passed beyond the reversible stage. Interpretation and treatment belong to the therapeutic dentistry course.
Spontaneous pain, including at night — Paroxysmal pain with no external stimulus, worse when lying down, sometimes radiating along the nerve. Indicates irreversible pulpal inflammation as the outcome of thermal or mechanical injury.
No pulpal response at follow-up — The tooth no longer responds to thermal or electric pulp testing; the crown may darken. A late outcome of overheating — pulp necrosis, often developing without a marked painful phase.
Pulp Chamber Exposure and Pulp Denudation
Pulp chamber exposure is the creation of a communication between the carious cavity and the pulp chamber. Pulp denudation is the state in which the pulp itself is visible through that communication. Exposure may result from the carious process (the floor is already destroyed before work begins) or be iatrogenic, produced during cutting. For a student, on the phantom and in the clinic alike, another distinction matters more: is the pulp exposed, or is the floor merely close to it? Every subsequent action depends on that answer.
Typical causes of iatrogenic exposure: lesion depth was not assessed on a periapical radiograph before starting; high-speed cutting was continued on the floor of a deep cavity; excavator pressure was directed vertically downwards instead of tangentially to the floor; the round bur used was larger than the remaining depth allowed; work was performed without a finger rest, so the bur plunged when tissue density changed; the topography of the pulp horns was not taken into account — in molars they rise closer to the surface than a flat radiographic projection suggests.
| Sign | Floor close to pulp, no exposure | Pinpoint exposure | Wide exposure |
|---|---|---|---|
| Appearance of the floor | Even, firm dentin; a translucent pinkish zone may be visible | Pinpoint defect with a droplet of blood at its centre | Floor defect with visible pulp tissue and bleeding across an area |
| Bleeding | None | A droplet appears at once and is easily arrested | Bleeding from several points or across the whole defect |
| Gentle probing | Firm resistance across the whole floor | The instrument drops at one point. That point must not be re-probed — the explorer enlarges the defect | The instrument passes freely into the pulp chamber |
| Patient sensation | Without anaesthesia — sensitivity on the floor without sharp pain | Without anaesthesia — sharp pain localised strictly to one point | Without anaesthesia — sharp pain; under effective anaesthesia it may not be felt at all, so absence of pain does not rule out exposure |
| Response to gentle drying | Dentin dries evenly and stays matt | The point refills with blood after drying | Blood keeps seeping; the field cannot be kept dry |
| No bleeding and no pain at all | The usual picture: the floor is intact and the pulp is vital and responsive | A bloodless, painless pinpoint defect of the floor does not rule out a communication with the pulp chamber — pulp necrosis is possible | A bloodless defect with dry greyish tissue in its depth suggests pulp necrosis; interpretation belongs to the therapeutic dentistry course |
| What to do | Stop high-speed cutting on the floor and preserve the remaining dentin | Stop immediately; do not probe, do not irrigate under pressure, do not continue cutting the floor; record the fact and the location | Stop; record the extent and location; do not attempt to "clean up" the cavity |
Under-preparation and Over-preparation
Under-preparation and over-preparation are the two ends of a single axis. At one end, fear of injuring the pulp and the wish to preserve tissue leave infected dentin, an unopened fissure and unfinished margins in the cavity. At the other, the urge to be "on the safe side" removes sound enamel and dentin that will never grow back. Both errors present with a delay: under-preparation as recurrent caries beneath the restoration within months, over-preparation as fracture of a wall or cusp after a year or more.
The practical difficulty is that the endpoint of caries removal is tactile and visual, not measurable by an instrument. The student therefore relies not on "feel" but on several independent checks that must agree with one another: the explorer, the appearance of dentin on a dried surface, the behaviour of tissue under the excavator, and the radiograph taken before work began. If the checks disagree, the cavity is not finished, however confident the hand may feel.
| Error | Cause | How to recognise it | How to prevent it |
|---|---|---|---|
| Softened dentin left on the floor | Fear of exposing the pulp; working with the excavator alone without visual control; poor lighting and a wet field | The explorer sinks in with a soft feel; dentin peels away in layers; the colour is dull and matt with no lustre on a dried surface | Dry field and directed light; probe the entire floor rather than its centre; in a deep cavity deliberately leave firm caries-affected dentin (demineralised but still vital, retaining the capacity to remineralise), but never softened dentin |
| Carious dentin left on walls and in angles | Attention focused on the floor; the angles are not directly visible and stay unchecked | A dark band along the enamel-dentin junction; on drying, the margin looks chalky and undermined | Inspect each wall separately, using the mirror for those not directly visible; check the angles with the explorer; cut under visual control rather than from memory of where the lesion was |
| Fissure not opened enough | Working only within the visible defect; tissue conservation misread as a reason not to open the cavity | The entrance is narrower than the floor; floor and walls cannot be seen in full; the instrument cannot reach the distant part of the cavity | In classical preparation, continue opening until floor and walls are fully visualised: an access narrower than the lesion forces caries removal to be done blind. Techniques with deliberately limited access (tunnel preparation, the slice technique) are a separate choice with their own indications, covered in the module on cavity preparation |
| Margin left unfinished, unsupported enamel retained | The finishing step skipped as optional; the margin perimeter never inspected as a separate task | The margin crumbles when the explorer is drawn along it; chalky undermined areas are visible on the dried surface | Inspect the whole margin perimeter as a separate step after shaping; remove enamel that has lost its dentin support |
| Cavity extended "just in case" | Preventive extension misread as mandatory for every material; uncertainty about the limits of the lesion | Cavity outlines run onto intact cuspal inclines and smooth self-cleansing surfaces with no signs of disease | Let the lesion define the outline, not geometry; extend only to sound tissue (the principle is covered in the module on cavity preparation) |
| Floor cut deeper than required | The requirement for a flat floor misread as equal depth everywhere; the wish to remove pigmentation down to ideally light dentin | Cavity depth clearly exceeds the depth of the original lesion; on a check radiograph the floor has approached the pulp chamber | Depth is set by the limits of the lesion, not by the colour of dentin: firm pigmented dentin on the floor of a deep cavity is not to be removed |
| Cusps and walls weakened | Faciolingual extension without assessing the thickness of the remaining wall; cutting "until it becomes convenient" | The wall is translucent under directed light; it feels yielding under gentle instrument pressure; the cusp stands on a narrow base | Assess the remaining wall thickness before extending, not afterwards; when weakening is found, record it and take it into account when choosing the restoration |
| Pulp chamber exposed while shaping the floor | Shaping the floor with a high-speed bur in a deep cavity; pulp horn topography ignored | Signs are given in the differential table of the previous section: a droplet of blood, the instrument dropping at one point, sharp localised pain without anaesthesia | On the floor of a deep cavity use hand or low-speed removal only; check depth against the periapical radiograph before starting |
| Perforation of a wall or floor outside the pulp outline | Loss of spatial orientation of the bur when working without direct vision; handpiece angulation not matching the long axis of the tooth | Bleeding from a wall rather than from the floor; the instrument passes beyond the contour of the tooth; sharp pain in the cervical area without anaesthesia | Keep checking the long axis of the tooth and the direction of the bur; work with a finger rest; where there is no direct vision, work through the mirror instead of guessing |
| Method | Finding | Note |
|---|---|---|
| Tactile check with the explorer | Firm, glassy resistance over the whole floor and all walls | The primary method. Check zone by zone: a single touch in the centre of the floor proves nothing |
| Visual assessment after drying | Sound dentin is uniform and lustrous; carious dentin is dull and matt, easily told apart on a dry surface | Requires a dry field and directed light: on wet dentin the difference is practically invisible |
| Assessment with the spoon excavator | Firm dentin does not peel away in layers and cannot be lifted with the blade of the excavator | A hand instrument gives tactile feedback that is unavailable when cutting with a bur |
| Caries detection dye | Staining of residual areas of affected dentin | An adjunct only: it also stains demineralised but vital dentin, so it is interpreted together with tactile findings, never instead of them |
| Periapical radiograph taken before preparation | Depth of the lesion and the distance from the floor to the pulp chamber | Determines the point at which the bur must give way to hand instrumentation. Assessed before cutting starts, not after a complication |
Damage to Surrounding Structures: Adjacent Tooth, Gingiva, Mucosa
The adjacent tooth, the gingiva and the mucosa play no part in the treatment, yet they lie a few millimetres from a rotating bur. The distinctive feature of this group of errors is that nobody usually notices them. The operator is concentrating inside the cavity, the damage occurs at the edge of the visual field, and under anaesthesia the patient says nothing. Such an error is found later: by floss that has started to catch on the neighbouring surface, or by a complaint of a sore gingiva or mucosa the next day.
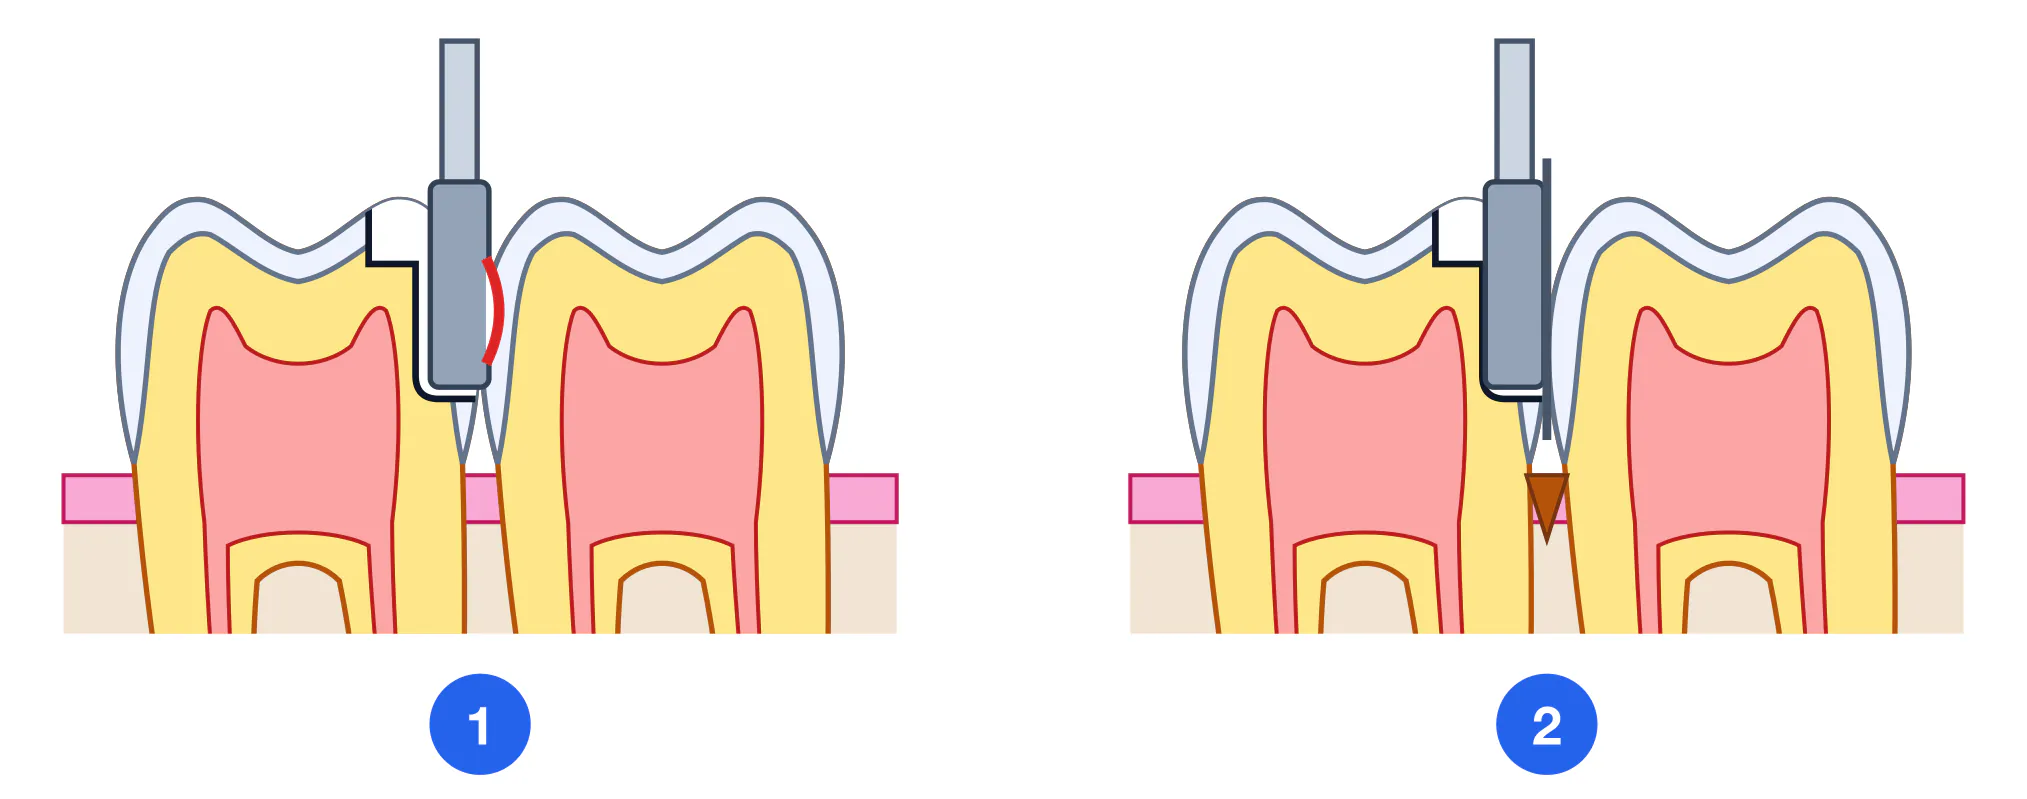
Three typical risk situations. Working on a proximal surface (Class II, III and IV cavities) puts the enamel of the adjacent tooth at risk. Working at the gingival margin (a cervical Class V cavity, the gingival wall of a Class II cavity) puts the marginal gingiva, the interdental papilla and the dentogingival attachment at risk. Inserting and withdrawing a running handpiece puts the mucosa of the cheek, lip and floor of the mouth, and the tongue, at risk.
| Structure | How it is damaged | How to recognise it | Protection |
|---|---|---|---|
| Enamel of the adjacent proximal surface | The bur touches the neighbouring surface while the proximal box is being shaped, or while the instrument is withdrawn from the interproximal space without control of its direction | A groove, step or roughness on the enamel of the adjacent tooth; floss catches and shreds precisely at that spot | A metal matrix band or protective strip placed in the space before cutting begins; withdraw the bur from the interproximal space by moving it away from the adjacent tooth, without stopping it while it is in contact with tissue: a bur stopped or bound inside the space tears the enamel and leaves a groove |
| Marginal gingiva and gingival margin | Direct contact with the bur while cutting the gingival wall of a Class II cavity or a cervical Class V cavity, where the cavity margin lies at the gingiva itself | Bleeding from the gingival margin during cutting; afterwards soreness, marginal oedema and delayed healing; with repeated trauma, recession | Retraction and isolation (rubber dam, retraction cord); cut under direct visual control of the margin; use light pressure close to the gingiva |
| Interdental papilla | Trauma from careless insertion of matrix and wedge, or from direct contact with the bur in the interproximal space | Papillary bleeding, a cut or a flattened contour; in the longer term, recession and a "black triangle" between the teeth | Insert matrix and wedge without force and match wedge size to the space; never use the papilla as a rest for an instrument |
| Mucosa of the cheek, lip and floor of the mouth | A rotating bur catches soft tissue as the handpiece is inserted and withdrawn; the tissues are not retracted with a mirror or retractor | A linear abrasion or laceration following the path of the bur; bleeding during the procedure; a painful erosion the next day | Retract the soft tissues with mirror or retractor before the bur is started; begin rotation once the bur has been brought up to the tooth but is not yet touching tissue, and stop it after the bur has been moved away from the tooth — only once rotation has ceased is the handpiece withdrawn from the mouth |
| Tongue | Involuntary movement of the tongue into the working area when lower teeth are prepared without isolation | An abrasion or laceration of the lateral border of the tongue; marked soreness and profuse bleeding | Isolate and retract the tongue, use a rubber dam; warn the patient; work with a finger rest on adjacent teeth so the bur cannot drift |
| Operator and patient safety | The bur skids when there is no finger rest; aerosol and flying tissue fragments | A cut on the operator finger; particles entering the eye of patient or operator | Finger rest on adjacent teeth or the chin; protective eyewear for both patient and operator; high-volume evacuation |
Roughened enamel on the adjacent tooth — The surface has lost its smoothness and floss catches on it. The damage itself is painless, but roughened enamel retains biofilm and raises the caries risk precisely at that site.
Bleeding and soreness of the gingival margin — The gingival margin has been traumatised by bur or matrix: bleeding during the procedure, oedema and soreness for several days, delayed healing. With repeated trauma the outcome is marginal recession and an exposed cervical area.
Abrasion or erosion of buccal or labial mucosa — A linear defect following the path of the bur: painful on eating and speaking, healing spontaneously within a few days. Requires an explanation to the patient and aftercare advice.
Laceration of the tongue or deep soft-tissue injury — Profuse bleeding, severe pain, suturing may be required. The procedure must be stopped immediately; management belongs to oral surgery.
Form Errors: Why Restorations and Teeth Fracture
Form errors differ from all the previous ones in that nothing is visible on the day of treatment: the cavity is filled, the margin is polished, occlusion is checked, the patient is satisfied. Presentation is deferred by months or years. The only way to learn to see them is therefore to read the chain backwards: from the character of the late failure, reconstruct which requirement of cavity form was violated. The requirements themselves — wall convergence, rounding of internal angles, a flat floor, a 90° cavosurface angle — are covered in the module on principles of cavity preparation and are not repeated here.
The mechanism behind all these failures is the same. Occlusal load is distributed according to the geometry of the cavity and of the remaining tissue. Wherever that geometry creates a stress concentrator — a sharp internal angle, a thin wall, an enamel edge without dentin support, an abrupt change of depth — a crack initiates and propagates under cyclic loading. Restorative material and tooth structure fail by the same principle: along the weak point that the cavity form created.
| Late failure | What to look for in the cavity form | Mechanism |
|---|---|---|
| Marginal chipping of the restoration while the bulk remains intact | A thin wedge of material on a bevelled enamel margin; the margin placed directly in an occlusal contact zone | Stress is maximal within a thin wedge; cyclic loading breaks off the margin while the bulk of the material stays whole |
| Cusp fracture months after treatment | Extensive faciolingual spread of the cavity; a thin wall at the base of the cusp; no support beneath the cusp | The cusp acts as a cantilever: load on its incline creates a bending moment carried entirely by the thinned base |
| Enamel crack running from the cavity margin | Unsupported enamel at the margin, a sharp external angle, a bevel on the occlusal surface | Enamel without dentin support cannot withstand bending: the crack starts at the margin and propagates along the enamel prisms |
| Bulk fracture of the restoration itself | Sharp internal angles, an abrupt step in floor depth, unequal material thickness in adjacent areas | The requirement for internal angles is set out in the module on cavity preparation; what matters here is the mechanism of failure. The crack is not produced by a single load but accumulates over cycles: where the geometry changes abruptly the material deforms differently from the adjacent zone, and shear arises at the boundary between them. The fracture runs from the internal angle towards the surface, so on a restoration that has been removed the line of fracture points to the place where the form was set wrongly |
| Loss of the whole restoration without fracture | A form that converges towards the floor; smooth walls with no retention where the material requires mechanical retention | The requirement for wall convergence belongs to the module on cavity preparation; what matters here is why the failure looks the way it does. With a form that converges towards the floor, occlusal load does not press the material against the walls but squeezes it outwards, like a wedge out of a slot. There is no fracture: the restoration comes out whole and the cavity beneath it stays clean and smooth — this is the sign that distinguishes loss caused by cavity form from loss caused by secondary caries or adhesive failure, where the cavity walls are altered |
| Marginal gap, marginal staining, secondary caries | An irregular, serrated margin; remnants of unsupported enamel; an overhanging restoration margin | An irregular margin prevents close adaptation; biofilm forms in the microgap and the lesion resumes beneath the restoration |
| Cervical fracture after a Class V restoration | The margin extended onto root cementum; a thin enamel edge at the cervix; a sharp transition between floor and wall | Cervical enamel is at its thinnest while the tooth is subject to bending loads — geometrically the most vulnerable zone |
Operator, Workplace and Instrument Factors
Most of the errors listed above are not a "failure of the hands" but a consequence of the conditions in which those hands worked. A student who cannot see the floor of the cavity will cut blind no matter how well the principles of cavity form are known. Prevention therefore begins before the handpiece is switched on: with patient position, light, isolation and a check of the instrument.
An error becomes unlikely when four conditions hold at the same time: the operator sees what is being done; the instrument is controlled and rested; the field is dry and isolated; the instrument is sound and appropriate to the stage. Losing any one of them reduces accuracy, and as accuracy falls the probability of all four groups of complications rises. A characteristic detail: an error caused by an awkward posture appears not at the beginning of the preparation but towards its end, when the hand is tired.
1 Visibility and lighting — Direct or mirror vision of the floor and every wall of the cavity; light directed into the cavity; a patient position that makes the working area visible without tilting or twisting the operator head. Working in shadow and through a fogged mirror is a direct cause of under-preparation and of unnoticed damage to surrounding structures.
2 Finger rest and instrument control — The handpiece is held in a pen grasp with the ring and little fingers resting on adjacent teeth or the chin. Without a rest the bur shifts as tissue density changes — the shared mechanism behind pulp exposure, wall perforation and mucosal injury. The rest matters more than the force applied.
3 Isolation and a dry field — Rubber dam, or cotton rolls with high-volume evacuation. A dry field is a precondition for visual assessment of dentin: on a wet surface carious dentin is almost indistinguishable from sound dentin. Isolation simultaneously protects mucosa, tongue and airway.
4 Operator and patient position — Back supported, forearms at the level of the working area, no twisting of the trunk, the patient positioned so that the surface being prepared faces the operator. An awkward posture produces tremor and loss of accuracy within a few minutes of cutting.
| Instrument problem | Sign | Consequence | Action |
|---|---|---|---|
| Dull, worn bur | The bur skids on the surface and needs pressure; the sound of cutting has changed; cutting is noticeably slower and the surface comes out rough | A steep rise in heat generation and thermal pulpal injury; irregular walls; extra time under the bur | Change the bur. Pressure does not compensate for lost cutting efficiency — it only adds heat |
| Bur of the wrong size | The working part is wider than the cavity or, conversely, is lost inside it; depth cannot be controlled | Too large — over-preparation and overheating; too small — an uneven floor, steps, a protracted procedure | Match size to the stage and to the size of the cavity; change the bur when moving from access to shaping |
| Bur runout or a worn handpiece chuck | Perceptible vibration, a wobbling bur, a rattling sound; the cavity comes out wider than the bur diameter | Uncontrolled widening of the cavity, vibration pain for the patient, damage to surrounding structures | Stop and change the bur; if runout persists, take the handpiece out of service rather than "finishing carefully" |
| Wrong bur-handpiece pairing | A latch-type bur placed in a friction-grip turbine or vice versa; torque insufficient or speed excessive for the stage | Loss of control over the instrument; pulp exposure on the floor of a deep cavity; overheating | Match bur, handpiece and stage of work. The systematics of burs and handpieces are covered in the instruments module |
| Faulty air-water spray delivery | The spray is weak, aimed away from the working part, or there is no water at all | A direct route to pulpal overheating regardless of how correct the cutting technique is | Check the spray before starting. If delivery is faulty, do not begin cutting |
Self-check of the Finished Cavity, and Summary
The finished cavity, immediately before restoration, is a point of no return. Once material has been placed, the floor, walls and margins can no longer be assessed, and correction would require removing the restoration and cutting again — that is, a further loss of tissue. Self-check is therefore performed as a separate, deliberate stage, not "along the way".
The checklist below does not replace knowledge of cavity requirements; it fixes the sequence of checks so that no zone is left unexamined. It must be run on a dry, well-lit and isolated field: in shadow and on wet dentin half of the items are unreliable.
1. Conditions for assessment — Isolation intact, cavity rinsed and gently dried, light directed into the cavity. Without this the remaining items are meaningless: on wet dentin and in shadow carious dentin cannot be told from sound dentin. (Rubber dam or cotton rolls, evacuation, operating light) (Before assessment)
2. The floor, zone by zone — The explorer checks the whole area of the floor, not only its centre: firm resistance everywhere, with no soft areas and no drop-through. Pay separate attention to the pulp horn projections and to the deepest point of the cavity. (Curved explorer)
3. Signs of pulp exposure — Inspect the floor for a point with a droplet of blood and for translucent pink areas. If such a point is found, do not probe it, stop cutting the floor, record the fact and the location. (Mirror, directed light)
4. Each wall separately — Walls are inspected one at a time, including the wall that is not directly visible — through the mirror. Check dentin firmness, absence of carious tissue in the angles, and dentin support beneath the enamel. (Mirror, explorer)
5. The margin perimeter — Draw the explorer along the entire cavity margin: it must not crumble, and no chalky undermined areas of unsupported enamel should remain on the dried surface. (Curved explorer)
6. Adjacent tooth and contact area — For Class II-IV cavities: inspect the proximal surface of the adjacent tooth and check with floss. Floss must not catch or shred on the neighbouring surface — that would indicate an iatrogenic groove. (Dental floss, mirror)
7. Gingival margin and soft tissues — Assess the gingival margin for trauma, bleeding or a cut interdental papilla. Inspect the mucosa of cheek, lip and tongue for abrasions left by the bur or handpiece. (Mirror)
8. Integrity of cusps and walls — Assess the remaining thickness of walls and the support of cusps: look for translucent or yielding areas. Weakening is recorded here — after the restoration is placed it can no longer be assessed. (Directed light, explorer)
9. Final decision — Restoration may begin only when all items agree. Any discrepancy means returning to the corresponding stage of preparation, not hoping to "compensate with the material".
| Self-check question | Reference answer |
|---|---|
| Why is thermal pulpal injury so often irreversible when the heating lasted only seconds? | The pulp is enclosed in the rigid walls of the pulp chamber and cannot swell outwards. The inflammatory oedema itself compresses the vessels, blood flow is impaired, and the injury continues after the bur has been withdrawn. Order of magnitude of the threshold: an intrapulpal rise of 5.5 °C produced irreversible necrosis in about 15% of teeth in the experiment of Zach and Cohen (1965). |
| A student removed all the pigmented but firm dentin from the floor of a deep cavity and produced a pinpoint pulp exposure. Which error is this, and where was the wrong decision made? | This is over-preparation. The endpoint of caries removal is dentin firmness, not dentin colour: firm pigmented dentin on the floor of a deep cavity is not to be removed. The decision went wrong at the stage of assessing the floor, not at the moment of exposure — the exposure was merely its consequence. |
| The restoration was placed without any problem, occlusion was checked, and a year later a cusp fractured. Where should the cause be sought? | In the cavity form: excessive faciolingual extension and a thin cusp base. The cusp acted as a cantilever and cyclic loading broke it at the thinned base. This could have been recognised during preparation — by a translucent, yielding wall under directed light. |
Key terms
Thermal complications: Pulpal overheating, Air-water spray, Intermittent cutting, Remaining dentin thickness, Thermal insulation
Tooth and pulp: Pulp chamber exposure, Pulp denudation, Pinpoint exposure, Under-preparation, Over-preparation, Weakened cusp, Unsupported enamel
Surrounding structures: Adjacent proximal damage, Gingival margin trauma, Papilla laceration, Mucosal abrasion, Matrix band protection
Prevention: Finger rest, Field isolation, Visibility and lighting, Bur replacement, Self-check checklist